Norma's Needleworkz

Tuesday, December 28, 2010

Year End Catch Up

I can't believe it has been so long since I've posted on my blog!!! The days have flown by and it is the end of 2010. Where has the time gone?

At any rate it is time to catch up with what has happened since my "vacation" class time at Sweet Briar back in June with a few photos. One of the things a bobbin lace maker needs is the proper threads....well not just lace makers, but any stitcher lol Here are some of the threads I purchased. These are truly lace weight threads. The smallest Finca labeled thread (second from the top) is a size 100. That is even smaller than the smallest size tatting thread I've used. Two of the other Finca labeled threads are size 40 (one white, one ecru). I also purchased a Finca in ecru size 50. I also purchased two spools of Egyptian Cotton size 50/2 (one white, one ecru). At this stage of the lace making game I don't know what the difference between 50/2 and 50 is, but I expect I'll eventually learn. The remaining eight spools of colored thread...couldn't resist buying colors...are all size 34/2. Again, I have no idea what the /2 means, but I have a lot to learn.


The next single spool is a #50 pure Irish Linen crochet thread. I can use it for lace making and tatting as well as crochet.


I figured while I was at it that I might as well treat myself to a birthday present which was coming up in a couple of weeks. So that is just what I did. Two beautifully decorated and painted bobbins. The third bobbin, the one on top, is the convention commemorative bobbin which is a "must have". Since blue is one of my favorite colors, I purchased a blue one that has a vine of morning glories painted on it. The middle bobbin is painted with gorgeous gold butterflies. There is also a small butterfly on the large bead.


Also for sale were some different style Midland bobbins. They are made of rare woods and weighted which eleminates the need of spangles. Haven't had a chance to try out these new bobbins as yet.

Well, it has been a while since posting, so invariably I mixed up the next three photos. No big deal. Will just mention them in the order they are shown. This first photo is of my new pillow cover cloth as yet unadorned other than the purchased lace trim that was given to me.


Here is the same cover cloth with the addition of a tatted hedgehog. For those that don't know, the hedgehog is the mascot of lace makers. The quills represent the many bobbins a lace maker needs to use.


Aha! Underneath the cover lies my newest lace making pillow. It is known as a "block" pillow. The individual blocks make moving the lace a simple matter. BTW I did cover this pillow myself. The individual blocks of styrofoam were first covered with felt and then with cotton to insure a long lasting pillow.


This last photo shows a sweater I knitted as a teaching piece. Two techniques were covered with this sweater. First the student learned to knit the body in the round, thus eliminating the need to sew up side seams upon completion. The second technique was to knit bind off the shoulder seams, again eliminating the need to sew these seams. This particular student had stopped knitting years ago because she "hated" to sew up seams. Hee, hee, I fooled her. Her next sweater included sewing underarm sleeve seams only. Again we incorporated the body in the round and did knit bind off shoulder seams. BUT. this time we picked up stitches around the armhole and knit the sleeves down. Because we had put a lace pattern in the upper body, we used the lace pattern in the sleeves and she had to sew the underarm seams up. She now feels very comfortable seaming her knits. Over the Christmas break she is knitting a ribbed cowl and I'm knitting socks.

Just discovered I have more photos to share, but need to edit first, so maybe I'll begin 2011 with a January post. Until next time
HAPPY NEW YEAR and don't make any resolutions you can't keep!

Friday, July 09, 2010

Gifties and Lace

The title is a slight misnomer as the first photo is part of the last lesson in my Color Theory Course I'm taking through StitchMAP a Yahoo group I belong to. I still haven't been able to add the "button" so you can visit and possibly join this fantastic group, but you can find it by searching Yahoo groups. But I slightly digress .....

For our last class exercise we were told to create our own color schemes in two ways. The first was to use a picture we like and collect items to make a design in that color scheme. Well, the photo I chose isn't a photo at all, but the booklet cover for a round robin sampler I'm involved in on another group. The threads I've chosen here are not the threads I'll be using on the sampler as I've chosen for that some over-dyed flosses and some Ginnie Thompson Flower Threads in these colors. When my work on the sampler is completed I'll share a photo here, but, alas, I've not started the stitching as I've not decided the design I'll be using.

The second photo is the second part of my lesson exercise. Here I had to collect items to use in a "Make Do With What You Have" color scheme. I had to laugh at this part of the exercise which was really very easy for me as most of what I do in my crazy quilting is to "Make Do With What I Have".

The focus fabric for this grouping (far left) has a mottled look and looks very much like a "dyeing experiment". It isn't, but was in a box of scraps given to me by a very special friend of long standing who has since passed away. Since this photo was made I have added dark and medium aqua threads to this mix. I'm not sure what I'll do with this grouping yet but will be putting these items into a gallon size zip-lock baggie for just when the "aha" moment strikes.

Now for the "Gifties"!

Just last week I celebrated my birthday and in my StitchMAP group we have birthday friends. My birthday friend, Amber, was most generous. This photo shows the top of a treasure box that she exquisitely embroidered. I just sat and stared in awe at her stitching. Isn't it gorgeous!!!!!

Then I opened the box ....... look what was inside! Now I didn't include the tiny zip-lock baggies she sent to hold the beautiful cameo "charms" (thats not really the word I want, but it will do) and the Dorset buttons she made with silk thread. The pink buttons are fabric covered with tiny embroidery and beads. I told Amber I'm almost tempted to make a pair of earrings out of the pink buttons so that I can really show off her delicate work. Amber coated the cameos with pearl nail polish which gives them a very special sheen.


Also in the box were two skeins of DMC floss and a very special stick pin with tea charms. Amber said she put that in just because she likes tea ..... well, Amber I, too, enjoy tea. In fact, while updating my blog I'm drinking my morning cup of green tea. The stick pin is just another "link" that ties two stitchers together. There was another item in my birthday gift bag ..... something I never would have known to look for, but already have plans to use. She included a 5 piece Diamond File Set. Again, Thank You Amber for being such a special Birthday Friend!

One of my vacation weeks (the other is in August) occurs the third week of June when I attend a bobbin lace event at Sweet Briar College near Lynchburg, Virginia. In order to have all my equipment ready for the week long class I had to finish up items on my pillow and then wind every bobbin I had with the correct thread which I ordered from my teacher for the class.

This next photo shows the two bookmarks I did in order to have an empty pillow. The bookmark on the left is done exactly as the directions my teacher gave me .... especially using the "ending" tassel she prefers. The book mark on the right is the same one with the "ending" tassel the pattern itself suggests.

I think I prefer the same tassel ending that my teacher does. It just seems to me to be a more polished finish.

The next photo shows my Lace Days piece in progress. It is not quite half done but is the result of about 40 hours of work. We had three pieces to "start" in our class. The class I attended was called "Starts and Finishes" and since I'm still a very relative beginner (just 2 years as a lace maker) I knew this would be a very good class for me. There were some lace makers in that class with 9 or more years of experience and they were able to "start" all three pieces. I can only concentrate on one piece at a time, but my local teacher will be able to help me work the other pieces. There were two of the ladies who actually finished this first piece and we all got to see how to make a beautiful "finish". The center is supposed to have a piece of linen sewn in, thus making a miniature hankie. To give you an idea of the size of this hankie, the linen is a 2 1/4" square. One of the exercises in this class was to look at a square pricking (what the patterns are called) and decide where to start. Something I hadn't had to do before as all the pieces I've laced up to this time either showed the "starting" place or my teacher pointed it out.

BTW I'll post a photo of the finished piece whenever .......

Making up for lost time in updating my blog (due to computer problems now hopefully resolved).

One Wednesday morning back in April while teaching a knitting/crochet class, a lady came in and asked if I knew anyone who would like to have her mother's tatting. She really wasn't interested and didn't just want to throw the items away. Since I also teach tatting I quickly said I'd love to have them!!!!!!!!!!!!
My other gifties ! The top shuttle is plastic without any markings and has a small pick. The aqua shuttle is celluloid and is at least 95 years old (I'm dating it from my grandmother's shuttle that I have which is 97 years old.

The bottom shuttle is also an antique and is made of gutta percha. I also have another of this type that I purchased. This is a byproduct of the rubber trees from the Phillipines and was used in making the black picture frames during the Victorian era. As you can see, all three shuttles have size 70 tatting thread loaded on them.

Then there was a bag of tatting ..... I've since washed and sorted this. Very basic tatting but often used around hankies or baby dresses, etc. Perfect pieces to use as seam embellishments for crazy quilting and some longer pieces for other items.


And then ......... the bag of tatting threads! Mostly size 70, but several balls of size 30. Many of the threads were varigated and quite a few were colors I didn't have. Lucky me!!!!!

Till next time enjoy blessings!

Monday, March 22, 2010

A Bit About Color And More

It is finally SPRING!!!!!!!!!!! Spring brings to mind COLOR! Currently in one of my groups I'm taking a Color Theory Course and that is mainly what this blog will be about, but first some other things I've been working on.


My newest wearable creation is this black crocheted shell cloche worked in two strands of fingering cotton thread. Someone on one of my groups asked the question "What is Irish Crochet?" My definition to her was "dimensional" crochet. Traditionally Irish Crochet is built up floral patterns (and leaves) added to a mesh background. Soooooo I decided to add a dimensional flower, in red, to my black cloche. The center of the flower is a fancy black button. The hat and flower remind me of the type of hat worn in pictures of my mother in her "flapper" days.

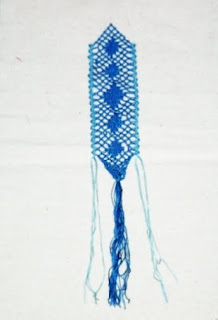
My latest piece of bobbin lace. This bookmark is worked in two shades of blue size 20 Anchor crochet cotton.


COLOR!!! A subject that sometimes just boggles my mind with decisions to make. So, I was tickeled "pink" when my StitchMAP group offered a course in Color Theory.

The first thing we had to do was make a color wheel, add matching floss if we could, then mark our favorite (complementary) color. One of my favorite colors is purple. The compliment of purple is yellow and that is one of my least favorite colors .... go figure! We then had to use a wavy line drawn between the warm and cool colors. According to the writer of the course my wavy line would have placed the yellow green on the cool side. My eyes do not see yellow green as a cool color so I have placed it on the warm side. After all this is my color wheel and I need to understand the colors as I see them.


Next we had to sort the colors into light, medium, and dark shades. Here is how I placed the color chips I had. All the color chips I'm using for my study came from the paint department of WalMart. It used to be when you went looking for paint chips you would find a strip of paper with quite a few shades of a color showing. I couldn't find anything like that but found nice size rectangles of color which make it possible to use one chip several different ways. Light colors on the left, medium colors in the middle and dark colors on the right.


Another chance to show warm and cool colors. If you'll look closely at the cool colors you'll see I've place the yellow green in this group. This is the same yellow green that I placed in the warm section of my color wheel. BUT here, the yellow green is definitely a cool color. There is a yellower, yellow green in the warm section. I'm finding that depending on what the color is placed beside will ultimitely determine the warmth or coolness of a particular color. Yellow green is one of those colors.


AHA!!!! Color Graduations! And here I thought this was "shades". Well, naturally I had to do a purple "graduation". There is a difference between shade, tint, tone, etc. and this course is helping me learn those differences. I also chose to do a green graduation ..... really two different green graduations. Then I did one in blues. If you'll notice these are all cool colors. Wonder why I didn't do one in the warm colors as I really like warm colors. Probably because my wardrobe is basically cool colors. I am beginning to adventure out and add warm colors to my wardrobe and I love those cheerful, bright colors.


The next part of our homework assignment was to show high and low intensity of colors. This was the hardest part for me, but I think I managed.


Now, for the stitching part of our assignment where we were allowed some freedom as to flower design, color choice and method of presentation (paper, paint, fabric, etc.). The author of the course provided a simple outline to embroider as well as a chart for cross-stitch. Our flowers had to be worked with three different temperature - cool, warm, cool & warm. On a tiny scrap of 14 count Aida I followed her chart using warm (shaded red) for the flower and cool (shaded green) for the leaves. My threads of choice were Sassa Lynne hand dyed perle cottons from the UK. This is my cool & warm presentation.


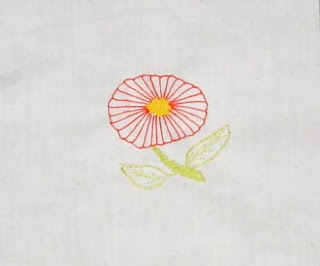
On a scrap of muslin I worked a buttonhole flower in warm (orange) with French Knot (yellow) center. The stem is chain stitch and the leaves are outline stitch with briar stitch (aka single feather stitch) for veins. My warm flower is a design I traced from Flower Designs Compiled by Dorothy B. Rush. This booklet is filled with line drawings that may be used in multiple mediums and was given to me. It must be self-published as it has no copyright, publishing, or other pertinant information.


My final flower was also traced from the Flower Designs book. My "cool" flower is stitched in purple using detached chain (aka lazy daisy) with a blue colonial knot for the center. The threads for both flowers were Ginnie Thompson flower threads.


If you find this course of interest to you, I'd like to invite you to visit and join StitchMap. You'll find us at http://groups.yahoo.com/groups/stitchmap/

Till we meet again may you have a blessed day!

Monday, February 22, 2010

Snow Days Knitting

The last time I posted I had begun teaching a class of seven little girls ages 8-10 at the Senior Center where I teach needlework. The class was for five weeks and I don't know who had more fun ..... the girls or myself. Several of the mothers also tried learning while "helping" their daughters. One of the girls was also teaching two older sisters and another was teaching her brother. Although my class was for seven, they were having so much fun that at home at least six others were also learning. In fact one of the mothers brought her project as well as the other two daughters projects to "show 'n tell" how much they all were enjoying learning to knit. At the completion of the class all seven were presented with certificates and also got to choose two bracelets that I had knitted them. I also gave them all another ball of yarn to practice with. They all finished their headbands (which was the learning project) and began a second project .... some chose to knit scarves and others chose to knit a small purse. They are all eagerly awaiting the next class where a larger project will be knitted. They will also learn to use circular and doublepointed needles in the next class. Although this class was garter stitch several of the girls learned to purl and worked ribbing on a circular hat I had begun for them to practice on ..... as you know if you take or teach a class there are always some who work faster than others, so it is important to not only keep their interest up but challenge the students.

The first photo shows the knitted bracelets I made for the girls. They loved them and know how to make them for themselves.


This winter has been one of much snow in the part of Virginia where I live and there were quite a few days where I was snowed in so knitting was a big part of what occupied my time .... I mean what better fun is there than to sit and watch the snow fall than with some knitting.

You know how I love my knitted socks ...... only five days to knit this pair, but I worked on several different projects. The yarn makes its own design and although you are "supposed" to begin each sock at the same color portion, I choose to do my own thing and just begin each sock at the beginning of each skein. They don't have to "exactly" match for me color-wise. When I'm working patterns I'm very particular that each sock looks as it should. But I find more fun and interest in the different color patternings.


Snow days accomplishments - three differnt scarves. The one on the left is knitted in a shaded purple worsted weight wool using the garter stitch dishcloth pattern. It sure doesn't look purple does it? The chair is a soft aqua and looks green. What a difference the lighting makes when I try to clarify color with the brightness/contrast on GIMP. The middle scarf is knitted in a bulky lime green acrylic with a double cable and only took three days (about 8 hours of knitting) to make. Also attached fringe which I normally don't. The scarf on the right is knitted with the "mistake" rib pattern using a worsted weight brown tweed. The mistake rib is one of my favorite patterns for knitting hats and works wonderfully well as a scarf.


The shaded blue pineapple bookmark is crocheted with a size 10 crochet thread. I'm trying to use up lots and lots of odds and ends of crochet threads that have been given me over the years and bookmarks are an excellent choice. Another snow days project.


Here is a cross-stitch band with darning patterns above and below that I stitched on a linen sampler round robin that I'm doing with one of my groups. I did add some aqua beads to finish.

This is what the whole band looks like at this point in time. The Assisi work band at the top was stitched by a fellow Virginian. The Hardanger band was designed and worked by the owner of this band who lives in Australia. The incomplete band in the middle was begun by someone who had to drop out, so the owner will "fix" that when her sampler returns to her. The blackwork band was stitched by a gal who lives in England, and then my band is at the bottom. The sampler has arrived back in Australia for another Aussie to "do her thing" and then it will go home.

I woke up with a headache this morning (very unusal for me) so had to miss my bobbin lace class again today. We were snowed out for several classes. Need to bring my current project up to date but not today.

I'm beginning a color theory class with my StitchMAP group and need to finish gathering my color groups to photograph and post in my album for evaluation. Hope to "see" you soon and in the meantime have a blessed week.

Sunday, January 17, 2010

Surprise!!!

Surprise! Surprise! After being absent from posting to my blog for several months, this year is starting off with two posts in one month. In my last post I mentioned and showed some of my tatting thread exchanges. The next day the last exchange arrived and so I had to share that one also. This exchange of beautiful yellow ribbon, some blue tatted flowers in #80 thread and pink #80 thread, plus earring findings and crystal beads arrived from Nicaragua Chile and took two weeks from mailing date to arrival date. I love tatting earrings but have never used crystal beads in the process, so am looking forward to this new experience.


Aha! Two more bobbin lace bookmarks. I mentioned in my last post about making a bobbin lace bookworm using #20 crochet thread. This one is made of blue and red threads ..... just the colors one of my granddaughters requested. The other bookmark is basic Torchon ground lace worked in two shades of green #8 perle cotton. I have to tell you the first time I attempted the Torchon ground pattern I used two shades of #80 tatting thread and the pattern said to use "half stitch". I remembered my teacher said that half stitch is not a good stitch for the outside edges .... you need some twists to firm up the edges. Well, instead of "listening" to my teacher, I followed the directions in the book. Well, when I finished and removed the bookmark from the pillow I ended up with a mess of threads and into the trash it went. I tried again, this time using the #8 perle cotton and using "cloth stitch and twist" for my outside edges. I probably could have had good results using "cloth stitch" but I wanted to be sure this one worked. I was very pleased with the results the second time.


One of these days I'll learn how to add the coding for any of my groups I mention within my posts, because I'd like for my friends to visit and see what we are about. One of my groups StitchMAP has TEASER contests every couple of months. They are fun and educational. The silkies in the photo below are my prize for participating.


Yipee!!!!! A second WIP completed. I knitted these socks in December (2009) but left the toes to be grafted .... my least favorite part of knitting socks. Well, this afternoon I broke down and finished the toes as I want to wear these socks this next week. My next pair of socks will be done from the toes up and I really like that method whether I'm using two circular needles or one circular needle. It is soooo much easier knitting socks on circular needles rather than with five double-pointed ones although I'm a pretty fast sock knitter when I get started on the double-pointed needles.

Tomorrow I begin a new adventure at the senior center where I teach several times a week. For the next five weeks I will be teaching 7 girls ages 8 to 10 how to knit in an after school program. I've taught children before but this a first at the senior center and I'm really looking forward to this class. We will be doing simple garter stitch projects ..... a headband and a purse. If they catch on quickly we might even get to do a stockinette bracelet. Then there is always the garter stitch discloth done as a square instead of on the diagonal.

I think I have a couple of shots left in my camera and must remember to take some photos of the girls "at work". Back at ya in a couple of weeks ..... ta da!!!!!!!!

Saturday, January 02, 2010

Out With the Old and In With the New

An appropriate title I thought to finish up some "old" bits of stitchery before beginning a new year of stitching.

Oh, about 25 years ago I was a charter member of the local quilt guild as well as the state quilt guild (gave memberships up when hubby's health began to deteriorate). During the time I was a member of the local quild we had some very nice workshops with well known teachers. This first photo is the result of one of those workshops. Can you see the idea of fall folliage trees????

We had to cut strips 1 1/2" wide and then in appropriate lengths to piece a picture of a favorite scene. Fall is one of my favorite seasons and so I pieced a scene as viewed from I 64 on Afton Mountain on the way to visit a sister-in-law and her family who lives in Charlottesville, Virginia. The idea of showing this as well as the next photo came about because on one of my groups .... StitchMAP ..... there was a thread about fall stitching. I had completely forgotten this piece and so had to go dig it out. Thought I'd share it here with the idea of possibly making a cq wall hanging sometime in the future. My StitchMAP sisters were very enthusiastic about this becoming a cq piece. I'm just not ready to work on it yet.


This piece was also a local guild workshop and was pieced using Jenny Byer fabrics. Since this is supposed to be a ship (flowered print) in full sail I can really begin to see a sea cq ..... wonderful possibilites here. Just have a few WIPs ahead of this one but may begin working on this one in a month or so.

From time to time I do a few commissioned pieces such as knitted Christmas stockings. This is the back of the one I did this year.


And here is the front.

In 2008 I was asked to complete a Christmas stocking that had been started by a knitter that had died during the year. The lady I knitted the stocking for was so pleased with the end result that she asked me to do this one for 2009. I have been commissioned to do two for this year.

Do your see all my thread goodies? On my HBT (Here-Be-Tatters) group I participated in a thread exchange. We were supposed to send 10 yards of a thread to five (or possibly six) people along with a favorite pattern or other small tidbit (no tatting involved). Several of my swappers sent beads and the little snowman tin (had fudge in it) is such a handy size to carry a shuttle, some thread and small scissors. It will fit in my purse just fine!!!! Several sent more than one thread and as you can see one swapper sent a full ball of thread. I also received several patterns. All the threads I received (except for the ball which is one of my favorites) were new to me and I'm looking forward to trying them all! This was really a lot of fun and I look forward to doing this again.


Previously I had shared some decorative "braids" in my bobbin lace that I was playing with on my own. This is the last of those braids, number 7, and I used DMC size 50 thread. The pattern is found in INTRODUCTION TO BOBBIN LACEMAKING by Rosemary Shepherd. This is one of two beginner books I'm trying to go through on my own as my teacher has in mind certain things she wants me to learn and I'm eager to try everything she wants me to do. What I'm doing for myself is using a variety of threads and fully grounding myself in the very simplest of patterns. I still need to build up my self confidence where bobbin lacemaking is concerned. Some techniques I try I go full steam ahead because the fibers are comfortable to handle. To make true bobbin lace you need very, very fine thread and I'm a bit hesitant .... no, I'm a whole lot hesitant when it comes to those very, very fine threads .... they sometimes need a magnifying lamp to even see them!


Just the week after Christmas I decided to try a different beginners book and even add beads to some bobbin lace.
Bookworm bookmarks .... hee, hee! Can you see their "beady" little eyes? According to Beginner's Guide to Bobbin Lace by Gilian Dye & Adrienne Thunder "this book describes the techniques needed to lead you step-by-step, through simple pieces that will give you practice in handling the bobbins and introduce you to a range of stitches." Well I knew the basic stitches and have had practice in handling the bobbins but this book uses a wide range of threads, such as size 8 perle cotton for the bookworm bookmarks, and even some yarns. The projects in the book that call for yarns don't seem to be calling me to do them. Using size 8 perle cotton makes the lace very dense .... even the half stitch "worm" on the right and to me bobbin lace is airy ... so the remaining pieces in this book that call for size 8 perle cotton I will use lace weight thread instead. BTW I'm not wild about using size 8 perle cotton for bobbin lace making .... a little too slippery, slidey for me although it does have a nice finished look. I also did one of these bookworms out of size 20 crochet thread (not shown in the pic). The thread thickness is about the same as the 8 perle cotton but the end result is consistant with a densely woven fabric .... not lacey looking at all. These bookworms are for my granddaughters who love to read.

My first completed needlework piece for 2010! This is a piece I really had some "fun" with. The first time I worked this piece I really had trouble turning corners and so asked my teacher if I could do it again.

This time she wanted me to play with the patterns and no two sides are alike .... a great learning "example" for my notebook. I still have to work on the finishing. The first time I had my teacher to guide me and this time I tried it on my own reading directions from my "textbook" The Technique of Bobbin Lace by Pamela Nottingham. The finishing was really fiddly to do but I wanted the piece off my pillow so that at my next lesson I'll be able to start something new. I don't know what my next piece will be and I have a few bobbins to empty. Guess I'd better get started on them.

Sunday, October 25, 2009

It's Been Awhile!

It has been awhile since I've posted anything here and I almost forgot how lol. Things do have a way of coming back at least momentarily. So let me see ....... what has been happening in my life since attending my first Lace Days retreat. The first thing I should say is that my bobbin lace teacher and I agreed the project was a bit too deep for a beginner ..... and I am a beginner although I've been lacing a full year now. I can't believe it has been a year since I began my newest stitching journey. Well, back to my lacing project. I scrapped it .... for now. I didn't throw it away or anything that drastic. I just retro laced (undid the work) and put the pattern aside until I have more experience under my belt.

So what am I lacing? Well right now I'm doing another handkerchief edging (just like the first one I did but with some minor changes. I really did a lousy job (MO) on turning the corners and the "sewing" where the beginning and the end meet and asked if I could try again. My teacher thought it a good idea and that is what I'm doing. But I'm also "playing" on my own.


Here are the first five examples in my Introduction To BOBBIN LACEMAKING by Rosemary Shepherd, an Australian lace maker. She calls these beginner pieces "braids". My teacher calls them "bandages". If you look closely you can see the gauze like look of the cloth bandages. The first one is worked in a red and pink #70 tatting thread. The second piece is worked in a pale orange #70 tatting thread and the third is worked in a dark orange and the pale orange #70 tatting thread. The last two pieces are worked in a lace thread - #30 machine embroidery by DMC. You can see how much more lacy looking the lace thread is. Since these are just "playing" bits they will all wind up on some cq squares sometime in the future.

I didn't tell you about the passing of a dear, dear friend and knitting student of many years. Just two weeks before her death she invited me to her home and gave me all her remaining knitting and stitching supplies. She had previously given me all her quilting supplies and much of her knitting yarns. Among those stitchng supplies were several kits, and baggies of DMC floss plus one of the floss caddy boxes full. The Santa pictured below was one of kits. It will be one of the "new" ornaments on my tree this year.


Another "new" ornament for my tree this year is the "soldier" stitched on a scrap of linen (I don't throw anything away .... at least thats how things used to be, I'm being more selective now), added a pinstitch hem with fringe. I cut a small piece from a thin dowel for the hanging rod and used a single strand of the gold DMC metallic thread for the hanger. The knot in the hanging thread doesn't show because I slipped it inside the pocket on the dowel.

Another "first" for me happened back in August after a trip with a group from the senior center and our annual visit to Scott's Family Resort in Deposit, NY. Everyone that goes on these trips are dancers .... line dancing for me. Well, this year, the fella that teaches the daytime ballroom dance sessions went with us and got me out on the dance floor. I've never done any ballroom dancing but with his instruction I found him very easy to follow. So to make a long story short .... I started ballroom dance sessions on Tues. afternoons at the center. I've met some very wonderful people and am enjoying this activity very much. So much that in September the center has a couple who teach ballroom dancing on Friday nights. Guess who is there with dancing shoes on????? You've probably all seen the tv commercials that say dancing is good for the heart ..... well, not only good for the heart, its wonderful all around exercise and just plain downright good fun!!!!!!!!!!!! My pastor and the choir tease me about appearing on Dancing With The Stars but this great grandma would break a leg just thinking about some of those moves! Never watched the show until I started dancing and the other dancers told me about it. A good bit of that doesn't strike me as true ballroom dancing so the show is not all that impressive. Too risque for me. I feel lucky when I can pick out some of the steps I've been learning.

Now its time to get back to my lacing project. TTYL