Norma's Needleworkz

Tuesday, January 30, 2007

Brrr....... baby it's cold outside

That's kinda what happens in the winter time isn't it???? Yesterday was very, very cold. Up until 9am the wind chill factor was 10-15 degrees below 0 F. and the warmest it got was 19 degrees. So very warm hand knit wool socks were in order. So I thought I'd share some of my hand knit socks (I'm not showing the whole pair, just one is all that's necessary to get the idea).

The solid knee sock in the first photo has a special meaning. Back in 1990 I took my first major excursion into another part of the world. Being a family researcher I joined the ROSE Family Association (my paternal grandmother was a Rose) and this group took a tour to Scotland to visit the Rose family castle (we also went to Wales, Ireland and England). While in Scotland I of course sought out yarn shops to purchase pure Scottish wool. Would you believe they could not be found where our group went......... until at the very last stop just miles before crossing the border from Scotland to England there was a small yarn shop. You know how you look for special significant souvenirs to bring home.......... I wanted a pair of handknit traditional kilt hose. Whoohoo...... the price was 60pounds per pair. That's when I started looking for the yarn shops tee hee In the shop that was pointed out to me by the tour guide I found the 100% wool yarn for my stockings AND the pattern.......... so I had to knit them.......... I love knitting socks. Of course that wasn't all the yarn I bought (VBG) The other sock in the pic when worn comes to just below the knee and also is made of 100% wool.

Any sock knitters out there in cyberspace know the name Elizabeth Zimmerman, born in England, married a German, came to America, etc. In one of her books she tells of knitting ski hose for her husband.... that's the patterned sock on top and I choose bright orange and a soft brown to experiment with and boy, not only do they fit well, but are very warm and comfortable. The bottom sock is also a traditional kilt hose pattern and is knitted of a beautiful greyish brown wool. So far all the socks I've shown you were knitted of sports weight yarn. For non-knitters that is a medium weight yarn.

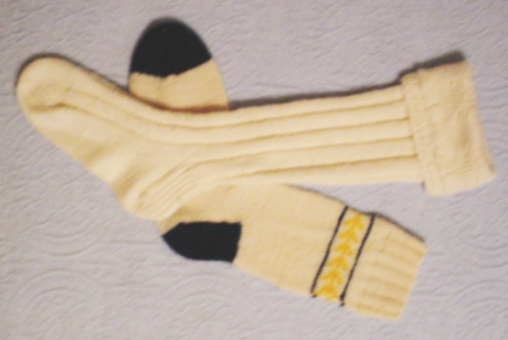
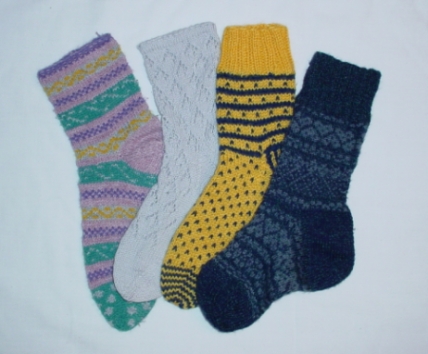
Now for some fun socks!!!! If I could wear clogs or similar type shoes I could really show off my socks. From left to right I have one of the most fun pair to knit - really they were. All the different patterns and colors oh my! Well, I have to tell you that this sock is patterned all the way around but on its mate the sole was knitted in stripes and not patterns.......... you see one is for the right foot and the other for the left tee hee The second sock is one of that is knitted in a fingering (or baby) weight yarn and is knitted of 100% cotton......... yes it is a wear in spring and summer sock. Oh, I still wear commercial socks because I haven't had time to knit all the socks I want to wear........ but I have lots of sock yarn to use! With the cold temp. of yesterday I had on one of my favorite pairs - the bright yellow and navy blue that you see above. The last one I'm showing is done in a tweed and so the little flecks don't show up but it is also knit of fingering yarn. I haven't shown any of my worsted weight socks - they are the ones that cause me to wear a shoe one size larger than normal in order to accomodate the thickness.

NOPE! Not socks....... but I just had to share this cap. It is done in Bohus knitting - a Swedish technique that was developed in the early 1940's. It is knit entirely of 100% needlepoint wool and is very lightweight. It looks complicated but is made up of knit, purl, and slipped stitches and is easy enough for an advanced beginner to knit. Doesn't the patterning remind you of embroidery stitches? I just had to throw that in for my embroidery friends all around the world.

Monday, January 29, 2007

Some Hardanger Stitching

Today I decided to play around a little with some of the photos in my files just to see what I could do on my own. What I decided to work with today is Hardanger. This first piece is a small doily done on Hardanger fabric (22ct.) and I use it in a glass lined serving tray my hubby (Bill) made when in high school (he graduated in 1955). The Hardanger is only about 12 years old.

This second piece is a mug mat....... in other words this is supposed to be used under your coffee/tea mug as a coaster. It is stitched on pumpkin colored linen with a varigated thread.

This piece is a guest towel and those who know me know I like butterflies so this butterfly was a special joy to stitch. The towel and threads are peach in color and the fabric is linen.

Three bellpulls I've done all on linen. The one on the left is a Hardanger sampler, dated 1992 and also has some counted cross-stitch across the top with a flower basket at the bottom. Above and below the row of cross-stitch flowers are some pulled thread sections. The rectangular section is drawn thread. The center bellpull is stitched with linen thread and has some sequins added. The tassel at the bottom is a varigated thread. The bellpull on the right is lined with a navy polished cotton and the stitching is done in yellow. I enjoy doing bellpulls as for the most part they don't take too long to make. Of course the time element varies with the size of the fabric and thread (VBG).

Here are some of my Christmas tree ornaments that didn't make it to the tree this year so I've included them here. The green stars are done on green Hardanger fabric. One stitched with green thread and the other with white thread. Love came down at Christmas so the center ornament is pink Oslo (22ct.) with a white heart stitched on it and lined with pink polished cotton. The tassel is of varigated thread. The red "snowflake" is also of a size to be used as a coaster.

The piece on the left is another style coaster and was stitched with varigated thread including the edge stitch. Fringing on Hardanger is fun to do. The piece on the right is a salt and pepper coaster. It is supposed to be used on the table with the salt and pepper shakers. It is a dark natural/tan linen stitched with a dark ecru thread. It really looks brown in the pic but it is not.

Here are two of my favorite pieces and I keep them in my study Bible. The green cross (I know, it looks black) is green Hardanger stitched with green thread. Green in the liturgical church color scheme represents spiritual growth. The bookmark on the right is stitched in green thread on natural linen and I inked my initials and date in the center section with a micron pen. It is fringed on both ends.

The last piece is really the first piece of Hardanger that I stitched. The technique was taught "in house" when I first joined our local EGA. In house means the teacher was a member of our EGA and she taught the class at her home. It is framed and hanging on the wall in my sewing room. I hope you have enjoyed looking at some of my Hardanger pieces.

Sunday, January 28, 2007

Week #3 and #4 of TAST Stitches

Well, I've still got a lot to learn as far as editing my photos. I spent over an hour trying to follow my notes but I had left out a step......... I think I've got that part down now as once I remembered what I'd been leaving out the process went a little faster. For week #3 of Sharon's TAST challenge the stitch - Detached Chain was really a simple one as it was one of the first stitches my mother taught me at age 5. I just needed to play with it a little. The first thing I did was using 18ct. Aida and adding some ultra suede scraps cut in ovals to form a 5 petal flower. The detached chain was done with a #16 perle cotton and really does not show up in this photo. I should have used a heavier thread in a contrasting color. The center of the flower is a button attached with #5 perle using French Knots. I'm just beginning to get comfortable using buttons in my cq work. I need to go back and look some more at Sharon's "I dropped the button box" post for additional inspiration. The piece on the top right is on 28ct. Quaker and using #8 perle cotton I just "played" with the stitch and did add some beads and French Knots. Nothing spectacular. Now on the bottom piece I used 32ct. Linen and taking a hint from Sharon's samples I did a padded flower. For my padding I used 2 white flannel circles and the first layer of detached chain was done in red #5 perle; inside those stitches I used green #16 perle. Around the outer edge are peach #5 perle Colonial Knots with green #16 perle "leaves" on the outer most edge. The very center is filled with yellow EdMar Lola in French Knots. The small flower to the right is just a "Lazy Daisy" purple #8 perle flower with French Knot stem and Detached Chain leaves. Just something to fill the space as I wanted the main interest in this sample to be the padded flower. The bottom "chain" is done in a #8 varigated perle. The earrings were worked on #22 Hardanger using Detached Chain, Stem Stitch and French Knots.


I still need to use darker threads but I really don't have many dark threads in my perles and they are my favorite threads at the moment. The first Cretan Stitch sample here is done on 14ct Aida in a #8 dark aqua as an elongated design. There are many possibilites for embellishing this particular design but I left it plain. On the bottom of that sample I used a total of 5 different rows of Cretan Stitch with varied spacings and 2 different size threads: #8 brown, #12 shaded browns. Then between rows 2 and 3 I added orange #5 French Knots. I really enjoyed working this pattern. Like I said, I'm just getting into using buttons, so on the pale blue #22ct Hardanger I used three mother-of-pearl flower shaped buttons attached with Pistol Stitch done in EdMar Lola and for the leaf I did what the A-Z of Embroidery Stitches by County Bumpkin Publications of Australia calls the Closed Cretan. I want to do that one again but with smaller thread AND smaller leaf size. Stem Stitch was of course used for the stems. The final sampler was also done on 22ct Hardanger. The top sample was done as a couching stitch over light purple satin ribbon with #16 perle in a dark purple. The middle group was done in a red #8 perle with the detached stitches in a red/black varigated #12 perle. The bottom grouping is incomplete. I've noticed that some people would call this "wisteria" and it probably could be used that way but I intended mine to be a "grape vine" grouping.
Looking forward to week #5.

Friday, January 26, 2007

Blogger is at it again!

Another dear friend, Catherine of the garden, has been told by blogger to switch to the 'new' blogger which she did. Now she is unable to access her old blog http://calidoresgardener.blogspot.com/ to post so she began a new blog http://calidoreshome.blogspot.com/ but cannot transfer her files from the old to the new. It seems that everyone but Catherine can access her old blog. As you blog hop please check out both of Catherine's blogs until everything gets straightened out. Thank you. By the way, blogger is not letting me access the html to properly put in the codes for you to access Catherine's blogs directly..... grrr! Is there a conspiracy against us?

Tuesday, January 16, 2007

**** Posting Problems****

Dear Friends, one of my favorite of all times bloggers is having posting problems. You can still visit and read all her wonderful postings and tutorials but Sandie (abeautifulcraft.blogspot.com) is at this time unable to add to her blog. Do continue to visit her as she tries to work through this problem but understand she doesn't know what the problem is and is trying to work things out. Let's hope it is soon Sandie as we miss your beautiful stitching and thoughts.

Sunday, January 14, 2007

TAST Week 2 and My Color Wheel

This is the second week for Sharon B's inaminuteago (see link in sidebar) Take A Stitch Tuesday and this weeks stitch was Buttonhole. Now I must say that in several of my stitching groups we have had a very lengthy discussion conserning whether this stitch is Buttonhole or Blanket. In checking several of my embroidery books even the published authors (from the 1970's) could not agree. At this point in time I will defer to Sharon calling it the Buttonhole Stitch.

The top left sample is done on 19ct. Cork Linen and reading from top to bottom the basic stitch is done in 2mm Silk Ribbon. For want of a better name I'll call the second section "mountain" because it reminds me of a mountain range and was worked in #8 DMC perle cotton. The third section known as alternating buttonhole stitch was done in a rayon thread approx. the size of #8 perle cotton and I really don't remember the name of the thread as it was a piece left over from a multi-thread needlepoint piece done about 16 years ago. The final section on the linen is done with #5 perle cotton.

The top right sample was stitched on #14ct. Aida with the double basic stitch done in #5 perle cotton. The second stitch of this grouping - closed buttonhole- is done in #8 perle cotton. I have no idea what to call the third stitch group but was something I just played with and is worked in 4 strands of DMC Rayon Floss. The triple stitch was done in three colors of #20 crochet thread and the bottom section was done in two shades of gold ...... the light gold is #8 and the dark gold is #5...... I ran out of thread in my needle on the dark gold and so that pattern was left unfinished..... after all this is a sample and not a sampler

Now to the really fun part. I have been enjoying using buttonhole flowers on some of the hearts I've been swapping in my ChainsOfHearts group and wondered how a buttonhole leaf would look. I really had fun with the flower and leaves in the bottom left sample done on muslin colored poly/cotton fabric. With the addition of stem stitch, running stitch and colonial knots I have a neat looking flower. The threads include #16, #8, and #5 perle cottons. The last sample was also done on the poly/cotton fabric. The red flower is a varigated #16 perle; the purple star flower using #12 perle has a miniature flower button for the center and the last flower uses #5 perle for the petals and #8 for the colonial knots. I really like the depth of the colonial knots.

Now to add some other finished and unfinished work using the buttonhole stitch. This is a pair or soon to be pair of pillowcases..... the top one has all the needlework done but I still have to seam the top end. These are 100% cotton tubing cases. I still have trouble with clear pictures but I wanted to show how I started and how I finished. When I began with the embroidery I followed the directions very carefully. At that time I didn't know I could do whatever I wanted to them and after finishing the first and starting on the second I realized that I didn't like the heaviness of thread so left the pair unfinished for a number of years. The basket is done in single strand DMC cotton floss and the pansies and leaves were started with two strands. Its pretty but was not the delicate look I wanted. Also the pansies were done in straight stitch with backstitch outline. Well, guess what, when along came the buttonhole stitch week I decided to get out the cases and finish using a single strand of floss and the buttonhole TaDa! I still need to hem and do the tatting for the second half of the pair but this now becomes one of my WISPs for 2007.


<--finished

uncooked-->

Now my latest heart to be swapped in the COH group has some of my dyed lace and all the seam treatments were done in one of my crochet thread dyeing experiments. The seam treatmens which include buttonhole do not show up as the thread is a light blue/green shading. In the green section I used #30 Sulky in the buttonhole wave. On the pale blue section to the left of the butterfly is one of my tatted motifs which does not show up at all nor do the few beads I've used but in reality the heart is very delicate looking and quite pretty.


During the second week of our TAST series, Sharon mentioned the importance of using a color wheel so I thought I would show you my version. In the early 1980's while an active member of our local quilt guild I became interested in Seminole patchwork as the result of attending a workshop at a quilt symposium. There I purchased a swatch packet of the solids used in Seminole patchwork. For years they laid in a drawer just looking up at me saying "What are you going to do with us?" Finally I decided to put those 1 1/2" x 2" pieces together into an unorthodox color wheel. The narrow border is 1" wide solid purple and the binding has just about everyone of the colors in the quilt in it. The binding fabric looks like someone just took paint and threw it causing the colors to splash and go everywhere but it was exactly what I was looking for. This is one of my teaching tools when questions on color come up as they always do. I use it for many of my needlework classes.

Well, hope to see you next week.

Wednesday, January 10, 2007

How to make a CQ Heart

While trying to help a new member of our Hand Embroidery group understand how to piece a Crazy Quilt Heart (she is new to crazy quilting) I offered these easy guidelines and with the encouragement of Melissa, list mom of the group, I place them here for others to use.
1. cut muslin approx. 7" square
2. draw 6 1/2" heart outline (I use a fine line Sharpie permanent marker); I also draw my 1/4" seam allowance line inside using dotted line marks
3. turn heart side down (leaves a faint line on the side where you are going to place your fabrics and the dark line makes it possible to see where to cut out the finished heart)
4. place first piece of fabric usually in the center or off center (can be a square, rectangle, triangle or the shape I prefer is a five-sided one) [you can pin if you want but it isn't necessary]
5. place second piece of fabric right side down on your first piece and sew a 1/4"seam (if the second piece doesn't quite fit the first don't panic, the third piece will cover
6. flip and press when pieces are sewn........ don't trim until the next piece is sewn...... trim any extra before you flip and press the third piece [to make sure you don't accidently cut your muslin foundation you may trim your pieces one of two ways: fold foundation under and trim sewn pieces to 1/4" or lift seam with scissors and trim to 1/4"]
7. continue #6 until heart shape is completely covered; on front of heart baste your seam allowance as a guide as to how far you can embroider
8. embroider, embellish - an embroidery hoop is helpful
9. cut out heart....... ... YOU'RE DONE!
Your heart is now ready to applique where ever you wish. There are many needlework blogs that show beautiful crazy quilted hearts and several Yahoo groups where members swap them. I have some here on my blog that I have made and some I've received in swaps.

Sunday, January 07, 2007

A new year filled with challenges

A challenge was issued by Sandie W., list mum of crazyquilting friends, to finish our UFOs, WIPs or as I prefer to call them WISPs (works in SLOW progress). The one I have chosen first to finish is a small Hardanger project. This is supposed to be intended as a sachet BUT upon completion I will use it as a Christmas tree ornament for 2007. I really don't have that much more to do........ just some needle weaving, picots and dove's eyes around three sides. This piece is done on 26 count linen with #8 and #12 perle cotton. I have already added the seed pearls although they should be added last. I'm one of those stitchers that just can't seem to wait to do last things last so........... the pearls are already on. It is a little hard to see them here but they are on the upper and right hand side of the "ships wheel" design in the middle. When this is finished I will try to post it again as well as my second project which at this time has not been decided upon.


A stitching challenge has been issued! Sharon B (sorry Sharon I forgot how to insert your url here) of inaminuteago (listed in the sidebar) is leading us this year in exploring a new stitch each week. This is something I am really anticipating and was particularly pleased that the first stitch to explore is one of my favorites - Herringbone. I have chosen to make my fabric pieces 4" x 6" to fit into postcard archieval sleeves for easy reference and it also means I don't have to do an extensive amount of stitching.
The first piece of fabric is 27 count linen and the top two left-hand stitchings were done with some of my hand-dyed crochet thread..... the first stitch is of course the basic herringbone and the second one is a criss-cross stitch which is new to me. The right hand stitch is double herringbone done in Ginny Thompson Flower Thread. The middle stitch is a 3/8" yellow (shows white) satin ribbon couched with the GTFT. I really enjoy the couching of ribbon with the herringbone. Above the ribbon are some straight stitches and below is another row of traditional herringbone. The last "stitch" in this group is a laced herringbone ....... the base stitch was with #8 perle cotton and the wrapped lacing was done with #12 perle cotton.

The next fabric piece is white 14 count Aida and I began with the middle stitch in #5 green perle cotton doing two rows of herringbone on the diagonal - that one was fun to do (as well as challenging) and I hope to use it in a seam treatment on a cq square. Next I did the top stitch with #5 red perle cotton and laced it with some eyelash knitting yarn. Sharon did say to be creative! The last stitch of this group is ladder lacing done in two shades of #5 perle.

On the top right I cheated a bit. I just received my newest book by Judith Baker Montano "Floral Stitches" well, on p. 132 in that book was this Herringbone, Straight Stitch, Lazy Daisy and French Knot design. I stitched this on 18 count linen with #5 perle cotton for all stitches except the Lazy Daisy where I used shaded yellow #20 crochet thread. I substituted bronze seed beads for the French Knots. What a gorgeous seam treatment for cq this will be.

The last piece was done on 18 count Aida with the top design done in standard herringbone and a reverse with an added straight stitch in the center....... done in GTFT ....... I really like working with the flower threads can't you tell? The 2nd stitch is triple herringbone..... foundation thread is a dark blue #5 perle cotton, the middle thread is a bright blue #8 perle cotton and the top thread is a soft lime #16 perle cotton. The next is closed herringbone done in #20 crochet thread followed by tied herringbone with the base in #5 perle and tied in #12 perle cotton. The last two stitches are not really easy to see. The largest is done in my hand dyed crochet thread (a different coloration from the first one) in what I would call a "honeycomb" pattern and the last stitch is done with 2 strands DMC floss in sort of a mountain shape - diagonal. One important thing I have learned is that I need to use darker threads so the stitches will show up better in the photos. Up close as I see them everything looks just fine but photos here need darker threads. Hopefully my next set of stitches will show up better.

Ah, now for my very first round robin - a couple of months ago I joined the Stitching Post list and have made some wonderful new friends (the list mom, ktj, was already a special friend from other stitching groups). Right off the bat a round robin was presented and I jumped on board. As you can see my design is not all that spectacular and I "interviewed" several stitch patterns before deciding on this one. One reason was this design, although I used several colors (one of which doesn't show up here) this could just as easily be worked in one solid or even a varigated color.